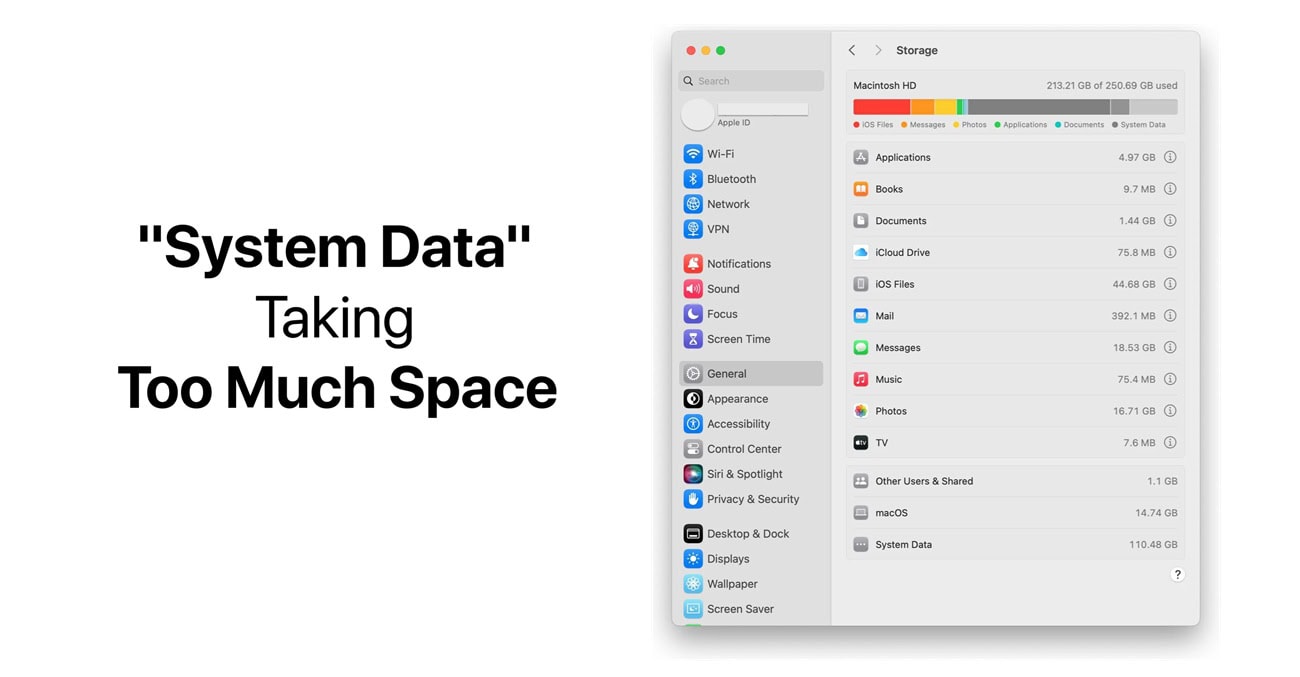
You check your Mac's storage and notice something weird: "System Data" (or "Other" on older macOS versions) is using 50GB, 100GB, or even more. Your Mac only has 256GB total storage and suddenly half of it is gone to this mysterious "System Data" category that you can't see or access normally.
I've been there. My MacBook Air with 256GB storage once showed System Data taking 147GB. One hundred and forty-seven gigabytes of... what? Apple doesn't make it easy to see what's actually in there or how to clean it out. I spent an entire Saturday figuring out what was eating my storage and how to get it back.
System Data is basically a catch-all category for everything that isn't apps, documents, or media. It includes important stuff like system files, but also accumulated junk like old caches, logs, backups, and temporary files that should have been deleted months ago.
This guide shows you exactly what's hiding in System Data and how to safely clear it out without breaking anything. Most people can reclaim 30-50GB by following these steps. I got back 89GB from my Mac. Let's get started.
What is System Data Anyway?
System Data includes a bunch of different things:
- macOS system files (you need these, don't delete)
- Cache files from apps and websites
- System logs and diagnostic reports
- Time Machine local snapshots
- iCloud Drive local copies
- App support files and preferences
- Temporary files that didn't get cleaned up
- iOS device backups (if you back up iPhone/iPad to your Mac)
- Old system updates that didn't delete properly
Some of this is necessary. Some of it accumulates over time and becomes bloated for no good reason. The trick is knowing what's safe to delete and what you need to keep.
Check How Much Space System Data Uses
Before we start deleting stuff, let's see what we're dealing with.
- Click the Apple menu (top-left corner)
- Click System Settings (or System Preferences on older macOS)
- Click General
- Click Storage
- Wait for it to calculate (takes 30 seconds to a minute)
You'll see a colored bar showing how your storage breaks down. System Data is usually gray. Mine shows 43GB right now, which is reasonable after cleaning it out. If yours shows 80GB+ on a 256GB Mac, you've definitely got bloat to clean.
Easy Wins: Built-In Cleanup Tools
macOS has some built-in tools that clear out obvious junk. Try these first before diving into manual cleanup.
Optimize Storage
In that same Storage screen, you'll see recommendations at the bottom. These actually work and are safe to use.
Store in iCloud: Moves older files to iCloud and keeps only recent ones on your Mac. Saves space if you have iCloud storage available. I use this and it helps a lot.
Optimize Storage: Automatically removes watched movies and TV shows. Only worth it if you use Apple TV app.
Empty Trash Automatically: Deletes items in Trash after 30 days. Should already be enabled by default, but double-check.
Reduce Clutter: Shows large files you might want to delete. Click Review Files and go through the list. I found a 12GB video file I forgot I had using this feature.
These built-in options are safe and easy. Use them first. But they usually only free up a few gigabytes at most. For serious System Data bloat, we need to dig deeper.
Delete Time Machine Local Snapshots
This is the biggest culprit for most people. Time Machine creates local snapshots of your files even when your backup drive isn't connected. These snapshots can eat up 50GB+ easily.
Check if you have local snapshots:
If you see a list of dates, you have snapshots. Each one might be several gigabytes.
Delete them:
Don't worry—you can safely delete these if you have a Time Machine backup drive or don't use Time Machine at all.
I freed up 34GB deleting Time Machine snapshots. They're useful as a backup safety net, but if they're eating all your storage, they've got to go. Your actual Time Machine backup on the external drive stays safe.
Clear Application Caches
Apps create cache files to load things faster. Over time these caches become huge—especially browsers and creative apps like Photoshop.
Safari cache:
- Open Safari
- Go to Safari menu → Settings
- Click Advanced
- Check Show features for web developers
- Go to Develop menu → Empty Caches
Or just clear Safari completely: Safari → Settings → Privacy, Click Manage Website Data, Click Remove All
Chrome cache:
- Open Chrome
- Go to Chrome menu → Clear Browsing Data
- Choose All time
- Check Cached images and files
- Click Clear data
Other app caches (advanced):
Open Finder, press Command + Shift + G and go to:
You'll see folders for every app installed. Some are tiny, some are gigabytes. You can safely delete the contents of these folders—don't delete the folders themselves, just what's inside them.
I typically delete caches for: Adobe apps (Creative Cloud creates huge caches), Microsoft apps (especially Teams), Spotify, and any apps I use heavily.
Your apps will recreate the cache files they need, so this is safe. I freed up about 8GB clearing caches.
Delete Old iOS Backups
If you've ever backed up your iPhone or iPad to your Mac, those backups live in System Data and can be massive.
Find and delete old backups:
Open Finder, press Command + Shift + G and type:
You'll see folders with long random names. Each folder is a backup of an iOS device. They're usually 10-30GB each.
Which Backup is Which?
Unfortunately, the folder names don't tell you which device. You can either delete all of them if you back up to iCloud instead, check the modification date (newest is probably your current device), or open iTunes/Finder, connect your device, and create a new backup, then delete the old ones.
I had three iPhone backups on my Mac totaling 47GB. I only needed the most recent one. Deleted the others and got back 32GB instantly. Important: Make sure you have either an iCloud backup or a recent backup before deleting these. Don't delete your only backup.
Clear System Logs and Diagnostics
macOS keeps detailed logs of everything that happens. These accumulate over months and can take up several gigabytes.
Clear logs:
Open Finder, press Command + Shift + G and type:
Delete old log files (keep anything from the last few days).
Then do the same for:
(Be careful with /var/log, only delete old dated folders)
Clear diagnostic reports:
Delete all files in there. These diagnostic reports serve no purpose unless you're actively troubleshooting a problem with Apple Support. Safe to delete. I cleared maybe 2-3GB from logs. Not huge, but every bit helps when storage is tight.
Clean Download Folder
This isn't technically System Data, but while we're cleaning, check your Downloads folder.
- Open Finder
- Click Downloads in the sidebar
- Sort by Size (click the Size column)
- Delete old installers, videos, zip files you don't need
I found 6GB of old disk images and installers I downloaded once and never deleted. Also had a 4GB video file I forgot about.
Remove Old macOS Installers and Updates
System updates sometimes leave behind installer files that should have been deleted but weren't.
Check for old installers: Open Finder -> Go to Applications. Look for anything named "Install macOS [version name]". Drag them to Trash. These installers are 12GB+ each. You don't need them after updating.
Clear update caches:
Delete everything in there (if the folder exists).
Then:
Delete contents. I found two old macOS installers totaling 28GB that were just sitting there for no reason.
Clear Mail Downloads and Attachments
If you use Apple Mail, it downloads and stores every attachment locally. Years of emails = gigabytes of attachments.
Delete Mail downloads: Quit Mail app completely. Open Finder. Press Command + Shift + G. Type:
Delete everything in there. These are temporary downloads that Mail caches. They'll re-download if you need them again.
Clear Mail cache:
(or V9, V8 depending on your macOS version). Look for folders named "MailData". Delete Envelope Index files (they're huge and will rebuild).
Only do this if Mail is taking up tons of space. Mail will need to reindex when you open it, which takes a while.
Delete Old Xcode Data (For Developers)
If you're a developer and use Xcode, the DerivedData and simulators can eat 20-50GB easily.
Clear DerivedData:
Delete everything in there. Xcode will rebuild what it needs. This is safe.
Remove old simulators: Open Terminal and type:
This removes old iOS simulators you don't need anymore. I'm not a heavy developer, but even I had 8GB of Xcode data I didn't need.
Empty Trash Properly
This sounds obvious, but you'd be surprised. Files in Trash still count against your storage.
- Right-click the Trash icon in Dock
- Click Empty Trash
If you've deleted a lot following this guide, emptying Trash might free up 20GB+ instantly. If emptying Trash takes forever: It's probably trying to securely erase files. Press Option while clicking Empty Trash to skip secure erase and empty it faster.
Restart Your Mac
After all this cleanup, restart your Mac. Sometimes macOS doesn't immediately update the storage calculations and a restart forces it to recalculate.
Click Apple menu -> Click Restart. After restarting, check System Settings → General → Storage again. You should see System Data significantly smaller.
Use CleanMyMac (If You Want an App)
If manual cleanup sounds tedious, CleanMyMac X is the best paid option for this. It automates most of what I just described.
The app scans for: System caches and logs, Old iOS backups, Mail attachments, Browser data, Time Machine snapshots, Everything else. It costs money (around $40/year), but if you're not comfortable using Terminal and manually deleting system files, it's worth it. I use it about once a month for maintenance.
Free alternatives: DaisyDisk (shows what's using storage visually), OmniDiskSweeper (finds large files). Both are good for finding what's taking up space, though they don't automate cleanup like CleanMyMac does.
What NOT to Delete
Danger Zone
Don't delete these or you'll break things:
- /System folder (core macOS files)
- /Library/Application Support files (unless you know what you're doing)
- Anything in /usr or /bin
- Files with "plist" extension (preferences - deleting them resets app settings)
Stick to caches, logs, backups, and temporary files. Don't go deleting random system folders hoping to free up space. I once deleted something I shouldn't have and had to reinstall macOS. Not fun. Stick to the safe stuff I outlined above.
How to Keep System Data Under Control
After cleaning it out, these habits prevent it from balloating again:
Maintenance Routine
Monthly: Clear browser caches, Empty Trash, Delete old downloads.
iOS Backups: Back up to iCloud instead of your Mac, or delete old Mac backups regularly.
Time Machine: Keep your backup drive connected so local snapshots don't accumulate. Or disable Time Machine if you don't use it.
Updates: Delete macOS installers after updating. Clear update caches periodically.
I set a calendar reminder for the first of each month to do basic cleanup. Takes 10 minutes and keeps System Data around 40-50GB instead of ballooning to 150GB.
When System Data is Actually a Problem
If System Data is 30-50GB, that's pretty normal. If it's 100GB+ on a 256GB Mac, you've got bloat.
Normal System Data size:
- 256GB Mac: 30-50GB is okay
- 512GB Mac: 50-70GB is okay
- 1TB+ Mac: 70-100GB is okay
If yours is way above these numbers after trying all the cleanup steps, you might have a corrupted file or macOS issue. Consider: Reinstalling macOS (preserves your files but resets system), Contacting Apple Support, Checking if a specific app is creating huge files (DaisyDisk helps identify this).
My Results
Final Score
Before cleanup: 147GB System Data
After cleanup: 43GB System Data
Space reclaimed: 104GB
Most of it was: Time Machine snapshots (34GB), Old iPhone backups (32GB), Old macOS installers (28GB), Caches and logs (10GB).
Your results will vary depending on what's accumulated on your Mac, but most people can get back 30-50GB pretty easily following these steps.
Final Thoughts
System Data bloat is annoying but fixable. Start with the big wins: Time Machine snapshots, iOS backups, and old installers. Those three alone usually account for 50GB+ on most Macs.
Then clear caches, logs, and temporary files. These add up to another 10-20GB usually.
Work through the list systematically. Don't skip straight to deleting random system files because you'll likely break something. Stick to the safe cleanup methods I outlined.
And after you've cleaned everything up, set a reminder to do basic maintenance monthly. Much easier to spend 10 minutes a month preventing bloat than spending an entire Saturday cleaning up 150GB of accumulated junk.
Your Mac will thank you with faster performance and no more "Your disk is almost full" warnings every time you try to download something.
Good luck with your cleanup. Hopefully you reclaim a ton of space like I did.